Learn how to handmade pixel art draw in photoshop
Pixel illustrations are great for creating computer icons, isometric images, and even entire scenes. They can be created quickly and easily using Photoshop with a few quick tweaks to the presets.
The only downside, however, is that the pixel art looks best with every pixel placed by hand as opposed to using a Photoshop filter. That's right, hand-placed - I know that sounds a little crazy, especially when some pixel scenes contain thousands of pixels. But without the hand placement, yours can pixel art look like a bad lo res picture so be careful!
I think a good rule of thumb before you start is that you should be able to see your creation clearly as a group of different colored square stones, but if you then squint and smudge your eyes you can see them as recognize image. Imagine making a tile mosaic, only you don't need grout.
Below is a full pixel artwork, we will create some of the more basic parts in this work.
Software
OK, let's prepare to draw. In case you don't have a copy of Photoshop, there are some free specialized pixel drawing programs available for free download:
- Pixels (Mac)
- Graphic Gale (Victory)
- More applications can be found here.
I've been playing around with both programs but have switched back to Photoshop because I'm used to the keyboard shortcuts.
Okay, let's set up a page
- First, open the preferences in Photoshop and set the image interpolation to Nearest Neighbor.
- Create a new page that is 300px by 300px at 72 dpi.
- Select the Pencil tool at 1 pixel. The pencil and eraser tools are the only tools you really need.
- Occasionally you can use the Magic Wand to select an area to fill, but make sure Anti-Alias is turned off.
If you've used the brush tool with a whopping 9 pixels instead of 1, then anti-aliasing occurs, which spoils the hard-edged pixel effect. So stick to 1 pixel. "Stay skinny, stay mean," as my mom used to say.
When your pixel drawing is displayed at 100% (actual size), the Pen tool is very small at 1 pixel wide, so it may be difficult to see and edit. One idea is to zoom in to 800% so you can see what you're doing. I often have a second window open in Photoshop with the same screen view at 200% so I can quickly see how my drawing looks up close and at the same time from a little further away.
We can save our working document as a PSD file and later export it as a GIF file for web use. We can also subsequently enlarge the file and convert it into a TIF for CMYK printing.
![]()
Let's start drawing
OK, let's try to draw something like this open book. Draw around the edge with the Pen Tool to create your black outline. Then fill in the flat colors of the page and bookmark.
Create the idea of text on the page with some single pixel lines. See how we add a slight kink to the line to give the impression of a slight curve on the page.
Finally, add some markers in the middle of the pages and on the side of the bookmark. A nice little touch is a single pixel highlight at the bottom outer corner of each page, it just gives a hint of a page border rather than being a solid block.
Once you've mastered the basics of outlines, colors, highlights, and shading, you can try creating other simple shapes.
![]()
Angled pixel lines
Pixel icons like the ones above can be designed as a series of lines that are only 90º to each other and are very much squares and rectangles. However, occasionally you may need a line at an angle.
Something to note is that angled lines look best when they are a regular pattern. If they are irregular (like those shown below), they can appear lumpy and coarse when viewed small. The second example below are much smoother isometric angles that look great with pixel art, but it's not the 30º "Iso" angle you used in technical drawing class - it's actually a bit closer to 26,5º. Unfortunately, 30º gives a lumpy line at 100%. If you draw a line that regularly goes 2 points above and 1 point up, you get 26,5º.
Shall we try drawing something else that's a little more geometric and uses more of those line patterns?
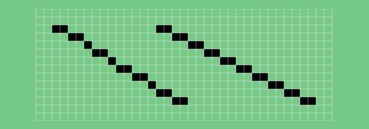
The irregular line looks lumpy at 100%.
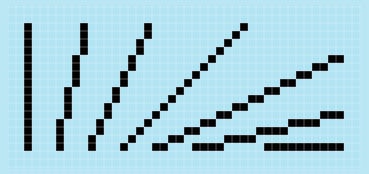
Smooth line pattern at different angles.
Let's draw a pixel log
The lines along the length are easy, we know how to do them now, but how about those rounded ends?
![]()
These two are regular patterns but change from broad horizontal lines to squares and then vertical lines. It looks ragged but if you pan your eyes it seems fine!
The upper right curve at the trunk end is also the reverse pattern of the lower left section. I often count the pixels or memorize certain combinations. The pixel combination on the circle is…
- 3 squares (across)
- 2
- 111
- 222 (below)
- 6
- 2
- First
![]()
It's a bit difficult to get the hang of at first, like using Bezier curves in Illustrator, but you'll soon get the "feel" for it. The length of the log is easy, we just use the 2 along 1 up system and make the log as long or short as we want.
Smaller concentric circles at the end create a nice ring pattern and some areas of darker shading at the bottom of the log give it some depth. We first give the tree trunk a flat fir color, then to create depth, we can create dithering by placing pixels of contrasting color on either side of our high light/low light lines.
![]()
You can build up the patterns and make them more complex. Be careful though - the more realistic and tricky you try, the blurrier the image can appear when it's meant to be reproduced at a small size.
I added a few more random pixels into log #3 as I wanted it to have a rough look and stand out a bit from the squirrel.
![]()
For the last log I worked in an area with stripped bark and a small branch. I found it best to finish an area or style first and then work on it in more detail. I don't think I could have drawn the stripped bark trunk with a dithering pattern from scratch - instead I just kept adding layers and layers. Simple stages work best!
![]()
Irregular pixel drawing
Let's move on to something more irregular, like a squirrel perched on our log. For something complicated like this, it's best to start with a pencil and paper.
First I drew an isometric square on my page to get the right dimensions. Since we're using this example for editorial purposes, I used a photo as a source of inspiration. Then I start sketching. I pay special attention to the angle on both ears and feet as I want them to follow the isometric lines.
As you can see the details are very minimal - I just want to work out the basic shape and the right angles first. We do the rest in Photoshop.
Bring in the sketch, put on a new layer and turn on the opacity so you can clearly see the pixels you want to create. It's not a hard and fast rule, but I find that pixel art looks best when it has black outlines.
![]()
Here I go around my squirrel with the Pen Tool and create the black outline. One thing to avoid is clumping, where outline pixels touch on more than one side. If you draw an extra square, just erase it with your eraser (also kept to 1px width, see red circle), it will look neater and your audience will thank you.
It still looks a little messy, but it will shape! Keylines within the illustration also help give it a bold look. Just make sure they're a dark color that's not black to add some contrast. Call me a radical, but I chose brown.
![]()
When the shape is complete, fill the inner area with a nice mid-tone color (soft brown) and maybe use a light color to bring out some highlights.
The black outline rule isn't hard and fast, I left some key black lines under the front jaw and paw as it became difficult to see what was going on.
![]()
Conclusion
Manually placing, removing, and manipulating pixels is where the skill comes into play. Once in a while. But once you get the hang of it, you can draw pretty much anything - all you need is a little patience. I hope this helps and inspires you to create great works of your own!